

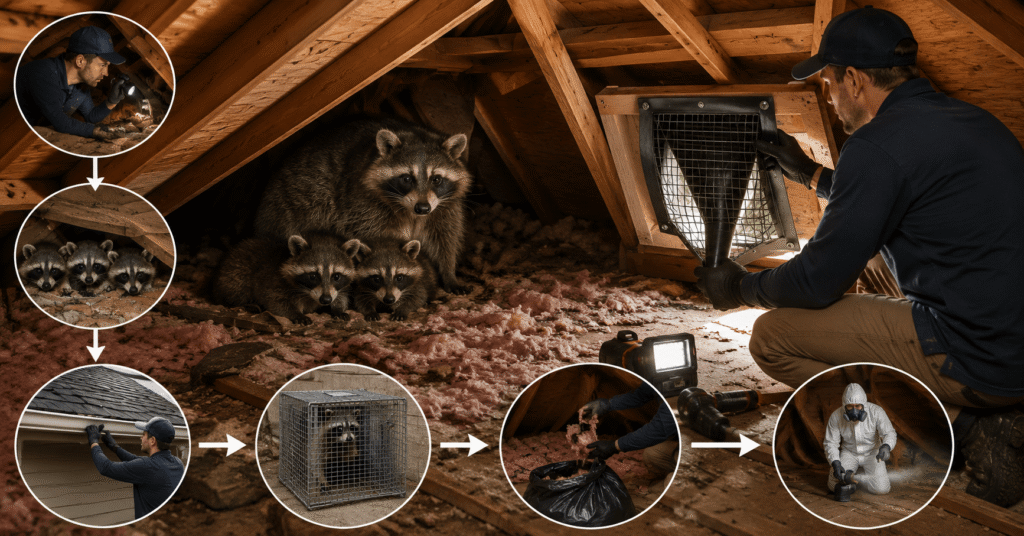
You wake at 2 AM to scratching and thumping in your ceiling. After 20 years removing raccoons from Toronto-area homes, I can tell you: it’s a mother raccoon with a den and time is now working against you.
Raccoons enter attics for shelter, not food. If it’s spring, she has kits. She won’t leave until they’re mobile typically 8–12 weeks of occupation. Meanwhile, she damages insulation, chews wiring, and contaminates everything with parasitic droppings. Every day you delay makes the problem worse, more expensive, and more dangerous.
Raccoons require immediate professional removal. A licensed operator installs a one-way door, seals all entry points, decontaminates the attic, and replaces insulation. Professional removal costs $2,000–$4,000 total. DIY attempts fail Ontario prohibits unauthorized trapping, and protective mothers are aggressive.
- Mother raccoons encode site memory. Once a successful den is established, she returns the following springprevention requires sealing every entry point.
- Spring timing is critical (March–May)—litter presence changes removal strategy entirely from fall/winter approaches.
- One entry point becomes a family den in 4–8 weeks; urgency matters
- DIY sealing fails because homeowners seal one hole while missing 2–3 secondary access points
- Professional cleanup is mandatory—roundworm parasites require antimicrobial treatment and HEPA containment
- Attractors drive persistence—garbage, pet food, and bird feeders keep raccoons returning regardless of sealing
- Delays escalate costs—$3,500 removal today prevents $8,000–$15,000 in damage, electrical rewiring, and medical expenses
Why Raccoons Choose Your Attic
Procyon lotor is a denning animal. Your attic mimics a tree hollow: elevated, enclosed, weather-protected, and if it’s a female during spring perfect nesting territory.
Critical distinction: Raccoons aren’t foraging in your attic. They entered through an access point because they found shelter. The attraction is outside: unsecured garbage, pet food, bird feeders, fallen fruit, or exposed compost.
Seasonal Behaviour Matters
| Season | Raccoon Activity | What to Expect | Removal Timing |
|---|---|---|---|
| Fall/Early Winter (Sept–Nov) | Solitary exploration; fatten up and scout den sites | Increased testing of roof vents and soffits; relatively easy eviction | Best time to seal entry points before spring |
| Late Winter (Dec–Feb) | Denned up; minimal activity | Silence doesn't mean departure; won't leave voluntarily | One-way doors ineffective; may require trapping |
| Spring (March–May) | Breeding season; females pregnant or nursing | Litter present; mother territorial and aggressive; won't abandon kits | Strategy: wait for kit mobility, eviction fluid, or one-way doors |
| Early Summer (June–July) | Kits mobile and foraging with mother | Natural family departure occurs; learning to hunt | One-way doors most effective; highest success rate |
| Late Summer/Fall (Aug–Sept) | Kits separate; young dispersal | New individuals test entry points; recurring infestations possible | Monitor seals closely |
Once a female establishes a den site, she encodes it as reliable territory. When pregnant again the following spring, her brain directs her back this is site memory. This is why sealing is permanent prevention; without it, re-infestation is nearly guaranteed within 12–24 months.
Identification: Signs of Raccoons in Your Attic
Raccoons are loud heavy thumping at night (2–4 AM), not squeaking like mice or daytime noise like squirrels. Mothers with kits are quieter during the day (foraging outside), very active at night when returning. Chitter sounds, growls, or aggressive vocalizations indicate protective mothers with litters.
Visual Evidence
| Sign | What It Indicates | Urgency |
|---|---|---|
| Droppings (3–4" tubular, blunt-ended) | Active occupation; latrine behaviour concentrated in one area | Roundworm contamination highest in latrine; immediate concern |
| Urine staining (dark marks, ammonia smell) | Extended occupation; urine penetrates insulation and ceiling drywall | Staining becomes visible on room ceilings; health risk |
| Shredded insulation bundled in corners | Nesting activity; typical of spring breeding season | Indicates litter likely present or expected |
| Multiple pathways through insulation | Exploratory behaviour; raccoon traffic routes | Confirms regular occupation; not casual visit |
| Fur and debris near entry points | Active movement; raccoon fur shedding along travel paths | Confirms recent/current activity |
How to Know If Raccoons Have Left
Silence doesn’t mean departure. Mothers stay 8–12 weeks with kits. After they leave, mothers return nightly to sleep. The only reliable confirmation: install a one-way door and monitor whether raccoons push it open from inside. No activity for 3–5 consecutive days indicates departure.
How Raccoons Enter Your Roof
Primary Entry Points Risk Assessment
| Entry Point | Vulnerability | Likelihood | Repair Difficulty | Prevention |
|---|---|---|---|---|
| Roof vents | Flimsy aluminum; easily torn | Very high (35–40% of cases) | Medium | Hardware cloth overlay, 4" beyond opening |
| Soffits/fascia | Wood rot; deterioration | High (25–30%) | High (replacement often needed) | Replacement or mesh reinforcement |
| Chimneys | Damaged/loose caps; deterioration | High (20–25%) | Medium | Proper cap installation with mesh |
| Flashing gaps | Water damage; poor installation | Medium (10–15%) | High (professional roofing) | Flashing replacement |
| Foundation/ground vents | Accessible at ground level | Medium (5–10%) | Low | Hardware cloth covers |
How professionals identify entry points?
Experienced inspectors examine roof perimeter with binoculars before climbing. They look for fur around edges, damaged materials, and worn pathways indicating repeated use. They inspect vents from inside the attic to confirm raccoon damage patterns.
They check ground level for scratch marks and disturbed material. They examine water staining, wood deterioration, and structural vulnerabilities. Only after comprehensive assessment do they identify the primary entry point and secondary access routes.
Your property attracted the raccoon first (garbage, pet food, bird feeders). Once exploring your yard, the raccoon discovers your roof vent or chimney gap and tests it. The entry point was there all along your property’s attractors created the discovery motivation.
Professional Removal Process
Do not attempt DIY removal. Ontario law prohibits unauthorized trapping. Mother raccoons with kits are aggressive and bite (rabies risk). Sealed entry points trap raccoons inside, causing panic damage.
Step-by-Step Professional Approach
Step 1: Thorough inspection (1–2 hours). Professionals inspect entire attic, roof, and foundation. They identify all entry points, assess damage extent, determine if kits are present, and evaluate litter development stage. This is the foundation of the entire removal strategy rushing inspection leads to missed entry points and failed prevention.
Step 2: Timing assessment. If kits are present, removal strategy depends entirely on their age. Young kits (0–4 weeks) require either waiting for development or using eviction fluid direct removal separates families. Mobile kits (8+ weeks) can follow mothers through one-way doors naturally. This assessment determines whether you wait, use eviction fluid, or deploy one-way doors.
Step 3: One-way door installation. A funnel is installed over the primary entry point. Raccoons exit but cannot re-enter simple physics but critical installation. The door stays in place 3–7 days minimum; confirms all animals have left. This method is nearly 100% successful if entry points are properly assessed.
Step 4: Secondary entry point management. Other entries remain temporarily unsealed to prevent alternative route adaptation. If you seal all holes simultaneously, stressed raccoons panic and find or create new exit routes, defeating the purpose of the one-way door.
Step 5: Confirmation of departure. Once raccoons leave (confirmed by one-way door monitoring), all entry points are sealed permanently with hardware cloth or structural repairs. This sealing is irreversible properly installed exclusion prevents re-entry indefinitely.
Step 6: Eviction fluid (if needed). If one-way doors fail within a week, predator urine (coyote or bobcat) signals danger to the mother. She relocates her litter within 24–48 hours naturally, without trapping or handling. This is humane, legal, and highly effective for reluctant mothers.
Step 7: Live trapping (if necessary). When one-way doors and eviction fluid fail, large cage traps (24–36 inches) capture raccoons without injury. Licensed operators relocate to appropriate habitat (Crown land, 20+ km away) per Ontario regulations. Trapped animals must be relocated within specific timeframes and distances.
Step 8: Attic cleanup. Contaminated insulation in the latrine area is removed entirely and replaced with new insulation. Surfaces are decontaminated with antimicrobial sanitisers meeting health standards. Ductwork is cleaned professionally if damaged. This isn’t cosmetic it addresses serious health risks from roundworm parasites and urine contamination.
Damage: What Raccoons Cost You
- Insulation destruction: 30–40% of attic typically damaged. Replacement cost: $2,000–$5,000+. Damaged insulation reduces R-value permanently if not replaced.
- Electrical/fire hazard: Chewed wiring creates fire risk. I’ve documented dozens of cases where attic fires traced back to raccoon-damaged wiring. Rewiring cost: $1,000–$5,000. This is not hypothetical it happens regularly.
- Structural damage: Panicked raccoons create new exit holes in drywall and roofing. A single frightened raccoon can expand damage from 4 inches to 12+ inches. Drywall and roofing replacement becomes expensive.
- HVAC ductwork: Raccoons nest in ducts, tearing insulation and perforating ductwork. Duct cleaning or replacement: $1,500–$3,000+. System efficiency drops 20–30%.
- Ceiling staining: Raccoon urine saturates insulation and permanently stains drywall below. Visible yellow-brown marks on room ceilings indicate significant contamination.
Health Risks: Why This Matters
Baylisascaris procyonis (raccoon roundworm)
Parasitic worm in raccoon intestines, shed in feces. Persists in soil for years. Infection occurs via inhalation of contaminated spores or ingestion of contaminated soil. Rare in humans (fewer than 25 documented cases in North America) but serious causes encephalitis, vision loss, or neurological damage. This is why professional cleanup with HEPA containment is mandatory.
Rabies
Raccoons are rabies vector species. Roughly 5–10% of GTA raccoons carry rabies. Most don’t, but any bite requires immediate post-exposure prophylaxis (PEP) $1,000–$3,000, four injections over two weeks. This is why DIY removal is genuinely risky. One bite from a protective mother costs thousands and requires emergency medical response.
Why DIY cleanup fails
Disturbing contaminated insulation without HEPA filtration spreads spores throughout your home. N95 masks and antimicrobial sanitisers are required. Professional cleanup prevents this health exposure entirely.
Attic Cleanup: Mandatory Health Work
Professional cleanup is not optionalit’s a health protection requirement.
What gets cleaned: Latrine areas (highest contamination) have insulation removed entirely and replaced with new. All surfaces receive antimicrobial treatment. HVAC ductwork is cleaned professionally if damaged. Hard surfaces (rafters, sheathing, joists) are sanitised with antimicrobial products meeting health standards.
Cost: $1,500–$3,500+ depending on attic size and contamination extent. Higher costs reflect proper removal of contaminated insulation (not just cleaning) and HEPA containment preventing spore dispersal.
Why professionals do this right: They use HEPA-filtered vacuums (home vacuums spread spores), proper PPE, antimicrobial sanitisers, and containment barriers. They remove rather than clean heavily contaminated insulation because parasites are encoded in fibers replacement is more effective than treatment.
DIY vs. Professional: Why Professional Wins
| Factor | DIY | Professional |
|---|---|---|
| Legal | Illegal in Ontario | Licensed, regulated, compliant |
| Safety | Bite/rabies risk | Trained, insured, protected |
| Entry point coverage | Usually 1 sealed; 2–3 missed | All identified and sealed |
| Success rate | 20–30% | 95%+ with guarantees |
| Health protection | No HEPA containment | Full antimicrobial treatment |
| Total cost (repeat infestations) | $8,000–$12,000 over 2 years | $3,500–$7,000 one-time, permanent |
Site Memory: Why Incomplete Prevention Fails
Once a mother raccoon successfully dens in your attic for 8–12 weeks, she encodes that location permanently. When pregnant the following spring, her brain directs her back to that proven location. This is site memory.
This explains why homeowners say: “We had raccoons removed five years ago, and now they’re back.”
It’s not coincidence it’s site memory. The same female raccoon (or her offspring, who inherit territory knowledge) returned because that location succeeded before.
Can I trap Raccoons Myself?
No. Ontario law prohibits unauthorized trapping and relocation. Violations carry fines regardless of intent.
Do mothballs or ammonia deter raccoons?
No. These are myths. Mothers protecting kits ignore sensory irritants. Raccoons are motivated by shelter and nesting needs, not odour.
Is it safe to enter my attic to check?
Only with N95 mask, gloves, protective clothing, and only if certain raccoons have left. Bite risk and rabies exposure are real. One bite costs $3,000+ in post-exposure prophylaxis.