

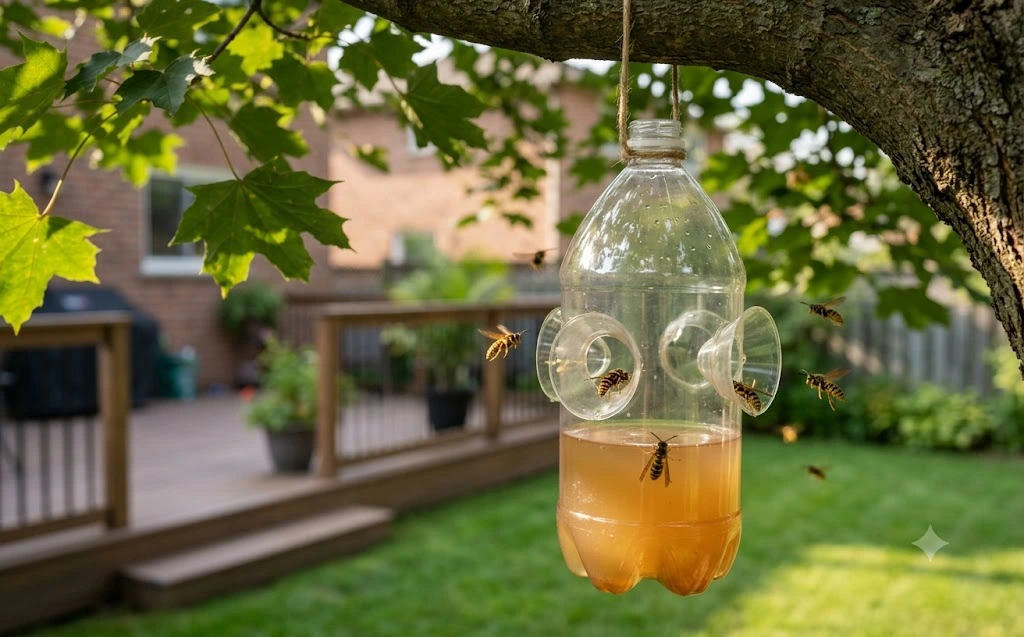
Every summer without fail, I get calls from homeowners across Scarborough, Brampton, and Mississauga who’ve spent $20 or $30 on a bright yellow plastic wasp trap from Canadian Tire, hung it near the deck, and watched it catch precisely nothing. Then they call us. And the first thing I tell them, before we even talk about whether there’s an active nest, is that a two-litre soda bottle from their recycling bin, the right bait, and ten minutes of their time will outperform most commercial traps on the market.
I’ve been dealing with wasps professionally for twenty years. I’ve removed nests from wall cavities in Markham, extracted colonies from under decks in Vaughan, and suited up for more aerial nest jobs in Etobicoke and North York than I can count. And one thing I know with complete confidence: a well-made DIY wasp trap, positioned correctly with the right bait for the right season, is a genuinely effective tool for managing wasp populations around your home, when you know what you’re doing.
Let me show you exactly how to do it properly.
Quick Answer: Cut a 2-litre plastic bottle one-third from the top. Invert the top piece to create a funnel and secure with tape or staples. Fill with 5–8 cm of seasonal bait (protein in spring, sweet in summer). Add a few drops of dish soap to break surface tension. Apply a thin layer of petroleum jelly inside the neck to prevent escapes. Hang 1.2 metres high, at least 6 metres away from human activity, and always service during early morning or late evening. Clean every 3 days.
Troubleshooting: Overcoming “Trap Shock” (Bait Avoidance)
Sometimes, you’ll witness wasps hovering nervously around the entrance of your newly hung trap without actually flying inside. This is known as bait avoidance or trap shock.
The Fix: Take a tiny amount of your bait (a smear of jam or a small drop of meat juices) and rub it directly onto the outside rim of the upper funnel entrance. This gives incoming scout wasps a safe, immediate taste of the food source. Once they sample the bait exteriorly without threat, their caution drops, and they will confidently dive straight into the funnel neck to get to the main source.
Do Homemade Wasp Traps Work? What I've Seen in the Field
The honest answer is: yes, with conditions. A homemade wasp trap is highly effective at reducing the number of foraging wasps in a given area. Used strategically in early spring, it can even eliminate emerging queens, which meaningfully reduces the size of the colony that establishes itself on your property later in the summer.
What it won’t do is eliminate an established nest. I want to be clear about that from the start, because a lot of homeowners set out traps hoping an entire infestation will disappear, and then wonder why it hasn’t after two weeks.
The trap works on a simple principle: wasps are attracted to the scent of the bait, they fly or crawl down through the funnel opening, and they can’t navigate back out through the narrow inverted neck. The dish soap in the bait solution breaks the surface tension of the liquid so the wasps can’t gain any traction on the surface, causing them to drown quickly.
What makes one trap dramatically more effective than another isn’t the container, it’s the bait, the timing, the placement, and the maintenance. Get these right, and a recycled soda bottle will genuinely outperform most store-bought options.
Know Your Target: GTA Wasp Identification Guide
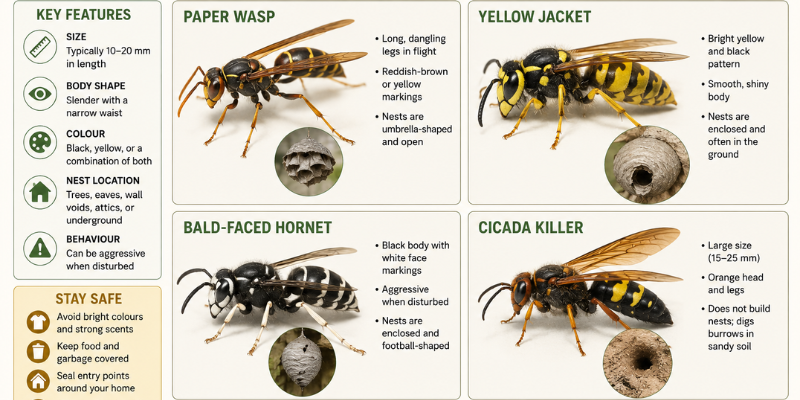
Before hanging your trap, you need to know exactly what species is buzzing around your property. Not all stinging insects behave the same way, and knowing the difference prevents you from targeting beneficial pollinators.
1. Yellow Jackets (Vespula sp.)
Appearance: Housefly-sized, bright black and yellow bands, distinct narrow waist.
Nesting Habits: Most commonly build underground nests in lawns, old rodent burrows, or deep within wall cavities and under concrete decks across Mississauga and Brampton.
Trap Effectiveness: Very High. They are highly aggressive scavengers and are the primary targets that fill up sweet-baited traps in late summer.
2. Paper Wasps (Polistes fuscatus)
Appearance: Slender, dark brown or amber bodies with yellow markings, and notably long legs that dangle beneath them when they fly.
Nesting Habits: Build open, exposed, grey paper nests shaped like an inverted umbrella. You’ll find these hanging under eaves, porch ceilings, window frames, and fence tops across North York and Etobicoke.
Trap Effectiveness: Moderate. They are generally less aggressive than yellow jackets but will readily enter sweet traps if placed near their flight paths.
3. Bald-Faced Hornets (Dolichovespula maculata)
Appearance: Large, robust, mostly black bodies with distinct white or ivory markings on their face and abdomen.
Nesting Habits: Build massive, fully enclosed, grey paper ball-like nests high up in tree canopies or on building exteriors, common in mature properties in Vaughan and Markham.
Trap Effectiveness: Low to Moderate. They are predatory and prefer live insects. Large aerial hornets’ nests are highly volatile and should be managed professionally.
4. Mud Daubers (Sceliphron caementarium)
Appearance: Thread-waisted, completely black or yellow-and-black, very elongated body.
Nesting Habits: Solitary wasps that construct small mud tubes on exterior brick walls or inside garages.
Trap Effectiveness: Not Applicable. Because they are solitary hunters that feed almost exclusively on spiders, mud daubers will completely ignore wasp traps. They are non-aggressive and rarely require intervention.
How to Make a DIY Wasp Trap — Step by Step
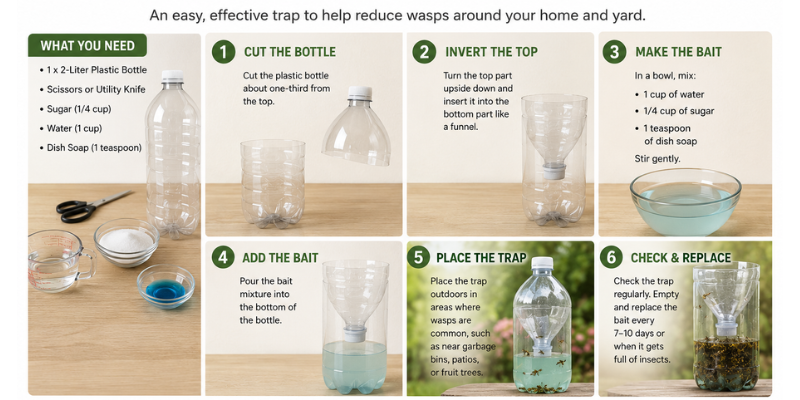
You’ll need: A clean 2-litre plastic soda bottle, a sharp utility knife or scissors, packing tape or a stapler, petroleum jelly (Vaseline), a hole punch, a length of sturdy string, and your seasonal bait.
Mark your cut line: Wrap a rubber band around the bottle approximately one-third of the way down from the top, just below where the bottle starts to widen. Use it as a guide to draw a perfectly level line with a marker.
Cut along the line: Take your time. A clean, even cut ensures the two pieces fit together snugly with no gaps that wasps could squeeze through.
Remove the bottle cap: Set it aside in your recycling box; you won’t use it. The open neck is the entrance funnel.
Invert the top piece: Flip the cut-off top section upside down so the neck points downward, and insert it into the bottom half of the bottle. This creates a classic funnel structure.
Secure the join: Wrap packing tape around the seam or staple it firmly. Ensure the fit is tight. Any gap larger than a few millimetres gives trapped wasps an easy exit route.
Apply the “Secret Ingredient” (Petroleum Jelly): Rub a thin layer of Vaseline or petroleum jelly around the inside rim of the inverted funnel neck. This is the step most internet guides completely miss. When wasps try to crawl back up the slick plastic to escape, they immediately lose their footing and slide right back down into the liquid.
Create a hanger: Punch two holes opposite each other near the top edge of the trap, thread a 30-centimetre piece of wire or sturdy string through them, and knot it tightly.
Add your bait solution: Pour your seasonal bait mixture to a depth of 5 to 8 centimetres. Ensure there is at least 5 centimetres of clearance between the bottom of the suspended funnel neck and the surface of the liquid. If the liquid is too high, wasps can drink it without falling in.
Wasp Trap Bait: The Single Most Important Variable
The bait is where most DIY wasp traps fail. Wasp dietary preferences shift dramatically across the season, and a bait that works brilliantly in June will catch absolutely nothing in August.
Wasps are primarily carnivorous predators in spring and early summer because they are feeding their larvae, which require protein to grow. In late summer and autumn, the queen stops laying eggs, the larvae are gone, and adult workers need quick sugar energy for themselves. This seasonal shift explains why wasps ignore sweets in June but become incredibly aggressive around your backyard barbecues and soft drinks by late August.
Spring and Early Summer Bait (April to late June)
Protein Bait Formula:
Base: 10 cm of water mixed with 4–5 drops of liquid dish soap.
Attractant: Suspend small pieces of raw meat, fish, deli turkey, or bacon fat just above the waterline on a small stick or wire running across the trap.
Note: The protein sits just above the water to broadcast the scent. When foraging wasps attempt to grab and lift the heavy meat to carry it back to the nest, they overbalance, lose their footing, and fall into the soapy water below.
Late Summer and Autumn Bait (July to October)
Sweet Bait Formula:
250 ml water
2–3 tablespoons of jam, fruit preserves, or mashed overripe fruit
2 tablespoons of apple cider vinegar
4–5 drops of liquid dish soap
Crucial Rule: Never use honey as bait. Honey strongly attracts honeybees, beneficial, struggling pollinators that you absolutely do not want to kill. Sticking to cheap jam, sugar water, or cheap colas mixed with apple cider vinegar ensures you preferentially target yellow jackets and paper wasps, as honeybees are actively repelled by vinegar.
Troubleshooting: Overcoming “Trap Shock” (Bait Avoidance)
Sometimes, you’ll witness wasps hovering nervously around the entrance of your newly hung trap without actually flying inside. This is known as bait avoidance or trap shock.
The Fix: Take a tiny amount of your bait (a smear of jam or a small drop of meat juices) and rub it directly onto the outside rim of the upper funnel entrance. This gives incoming scout wasps a safe, immediate taste of the food source. Once they sample the bait exteriorly without threat, their caution drops, and they will confidently dive straight into the funnel neck to get to the main source.
Where and When to Place Your Trap
A well-built trap with the right bait will still catch almost nothing if it’s in the wrong location. Placement is the second most important variable after bait, and it’s where I see the most easily avoidable mistakes.
| Rule | Why it matters |
|---|---|
| Hang 1.2 metres above ground | Wasps fly and forage at a specific height range. Ground-level traps are largely ignored. A trap hanging at roughly chest height intersects the foraging zone where wasps are actively moving. |
| Place at least 6 metres from people | The bait actively attracts wasps. A trap near the patio table draws wasps toward where people are sitting, the opposite of what you want. Place it at the perimeter of your property, near the fence line or at the garden edge. |
| Near known activity, not in the middle of nowhere | Place where you’ve observed wasp traffic, near the eaves they fly under, near the deck corner where they congregate, near the garbage area. If you’re not seeing wasps near the trap, move it. |
| Regulate temperature in extreme heat | In hot GTA summers (30°C+), move the trap to partial shade. Fermented bait in direct sun degrades quickly and becomes less attractive. On cooler days, keep it in sun to warm the liquid and release more scent. |
| Check and clean every 3 days | Dead wasps accumulate and form a floating raft on the bait surface. Live wasps entering the trap can stand on dead ones and find their way back out. Empty, rinse, and refresh the bait every 3 days without fail. |
The Most Critical Strategy: Spring Queen Trapping
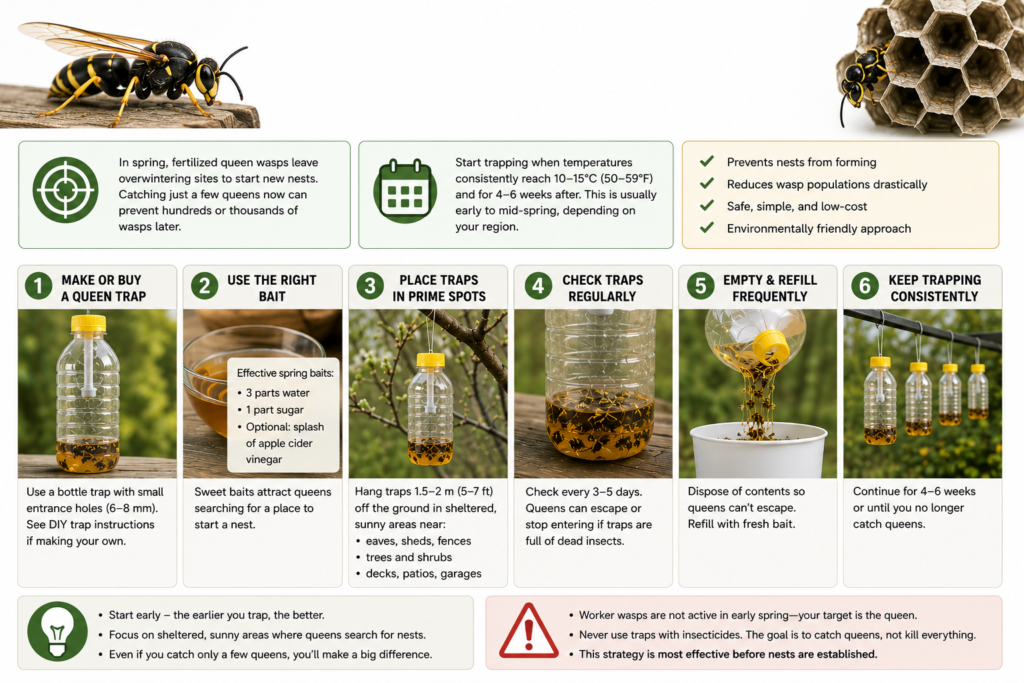
This is the professional insight that separates effective property management from reactive swatting. Most homeowners don’t think about wasps until August when their backyard gatherings are already a nightmare. The time to act is actually late April and May.
Every single wasp colony you encounter in the summer was started by a solitary queen wasp that overwintered alone in a wood pile, under tree bark, or inside a crack in your siding. In early spring, she emerges completely alone to find a nesting site and forage for protein to raise her first small batch of worker larvae. She is highly vulnerable and easily catchable.
Each queen wasp you catch in May eliminates a colony of 3,000 to 5,000 workers in August. Homeowners in North York and Ajax who run protein-baited bottle traps starting the last week of April notice a massive, dramatic drop in wasp pressure by late summer compared to the rest of their neighborhood.
How to Make a 5-Gallon Bucket Wasp Trap — For Serious Infestations
The bottle funnel trap is ideal for general control and early-season queen trapping. But if you’re dealing with a higher-pressure wasp situation, a large established colony nearby whose foragers are covering your entire property, a 5-gallon bucket trap offers significantly higher capacity.
I use this design on properties with persistent wasp pressure, particularly where multiple nests are suspected in adjacent greenbelt or wooded areas, common on properties backing onto the ravine systems in Scarborough and Etobicoke.
Step-by-Step Construction:
Prepare the Base: Fill a clean 5-gallon plastic bucket with 10 to 15 centimetres of water. Add a generous squirt of liquid dish soap (like Dawn) and stir gently. The soap breaks the water’s surface tension, ensuring wasps sink instantly rather than skating on top.
Set up the Bait Line: Run a length of sturdy wire straight across the open top of the bucket, securing it tightly through holes drilled on opposite sides of the rim or wrapped around the handle joints.
Suspend the Attractant: Hang your protein bait, such as a piece of raw fish, chicken, or bacon fat, from the centre of the wire so it dangles exactly 2 to 3 centimetres above the soapy water surface.
Leave it Uncovered: Unlike the bottle trap, the bucket trap stays wide open. Wasps land on the meat to tear off a piece. Because wasps are incredibly strong relative to their size, they will attempt to fly off with a chunk that is too heavy for them. The heavy load causes them to overbalance, lose altitude instantly, and drop straight into the soapy water below where they drown rapidly.
Positioning: Place the bucket trap using the same parameters as the bottle traps, along the property perimeter, near known wasp flight paths, and at least 6 metres away from your patio or dining area.
When a DIY Wasp Trap is Simply Not Enoughv
While a homemade trap is an exceptional tool for monitoring, intercepting spring queens, and reducing the volume of outdoor foragers, it has clear structural limitations.
A DIY trap CANNOT:
Destroy or eliminate an established structural nest.
Stop defensive, aggressive swarming from an active colony hidden nearby.
Reach a queen who is safely deep inside a wall cavity laying hundreds of new eggs daily.
If your DIY traps are filling up with dozens of wasps every few days, it shouldn’t be viewed as a victory, it’s a warning sign. It means there is a mature, fully established colony directly on or adjacent to your property that needs to be systematically located and neutralized.
If wasps are entering your home’s soffits, brick weep holes, or attic vents, do not try to trap your way out of it, and never plug the entry hole (doing so will force thousands of chewing wasps to break through your drywall into your living spaces).
Anaphylaxis Warning: If anyone in your immediate household has a known or suspected allergy to wasp stings, do not attempt any form of DIY wasp control or trap maintenance. A single sting can trigger a life-threatening allergic reaction within minutes. Keep an accessible EpiPen on hand, ensure family members know how to use it, and leave all nest management to a licensed professional.
At Wildlife Removal Toronto, we specialize in locating hidden, structural nests that homeowners can’t see, under decks, deep within attics, and inside wall voids, treating them safely, permanently, and humanely across the entire Greater Toronto Area.
Build your traps early, use them wisely, and if your traps indicate you’re facing a much larger infestation, give us a call. We serve Toronto, Mississauga, Brampton, Vaughan, Markham, Scarborough, North York, Etobicoke, Ajax, and Pickering with decades of verified field experience
Frequently Asked Questions
How long does it take for a homemade wasp trap to start working?
Typically 24 to 48 hours for the first catches, depending on proximity to wasp activity and whether the bait is appropriate for the season. If your trap is in the right location with the right bait and you’re seeing no catches after 48 hours, move it, wasps aren’t finding it where it is. Don’t change the bait before trying a new location first.
What is the best bait for a wasp trap in Ontario?
In spring (April through late June): protein-based bait, raw meat, bacon fat, or pet food in soapy water, or protein suspended above the water line. In summer through autumn (July to October): sweet fermented bait, jam or fruit preserves with apple cider vinegar and dish soap in water. The vinegar enhances the fermented scent yellow jackets love while discouraging honeybees, which don’t find vinegar appealing. Never use honey, it preferentially attracts bees rather than wasps.
How far should a wasp trap be from my house and patio?
At least 6 metres (about 20 feet) from where people gather. The trap actively attracts wasps, placing it near your patio or dining area draws wasps toward people. Place it at the property perimeter, near the fence line, near the garden edge, or near where you’ve observed wasps entering and leaving. The goal is to intercept them before they reach your outdoor living space, not to lure them into it.